Compatibility:
WebSite X5 Evo and Pro
Creating a professional website may seem like a complex task, especially if you have no programming or web design skills. In reality, with the right tools, you can turn an idea into a complete, responsive website published online much more easily than you might imagine.
With WebSite X5, you can build your website in a completely visual way: choose a template, customize graphics and contents, organize pages, and publish everything online without writing code.
You can start from:
- a ready-made template complete with graphics and structure;
- a project created with MagicSite AI;
- an empty template to create everything from scratch.
Watch this video where, in just a few minutes, we show you the essential steps. Or continue reading the step-by-step guide.
With WebSite X5, you can create your website in 5 steps:
- Create the project and choose where to start
- Customize the template
- Organize the website structure
- Build the pages and add contents
- Publish the website online
#tip - The website created will automatically be responsive and optimized for desktop, tablet, and smartphone devices.
How to create a website step by step
1. Create the project and choose where to start
The first step is to create a new project and define the general website settings:
- Start WebSite X5 and, in the startup window, click the New Project button.
- Choose how you want to start your website:
- starting from a predefined Template;
- using Artificial Intelligence with MagicSite;
- or starting from scratch with an empty Template.
- If you choose to start from a predefined template, browse the available gallery using categories, filters, and search.
- Use the Preview button to open templates in the local browser and check their structure, graphic style, and responsive behavior.
- When you find the most suitable template, click Edit: the project will be created automatically.

- In Step 1 - Website Settings, open the General Information section and enter at least the Website Title.
#tip - Do not worry if you are not yet sure how to complete all the required project information. If you are using the Pro or Agency edition, you can get help from MagicText, the AI-based text generation assistant. In any case, you can also decide to add the missing information later, when your ideas are clearer.
2. Customize the template
WebSite X5 templates are mini websites complete with graphics, pages, and contents. Everything can be customized to suit your project.
For example, you can start by adding your business logo to the website header:
- Go to Step 2 - Template > Template Content.
- Stay in the Header section.
- Insert an Image Object by dragging it into the workspace.
- Use the anchors and available tools to position and resize the content.

- Double-click the inserted Image Object to open the settings window and import your logo file.
- Click Preview to check the result directly in the browser.
#tip - With the same simplicity, you can add other Objects as well as modify or remove Objects already included in the template. You can learn more in the guides available in the Template section.
3. Organize the website structure
Now that you have defined the general appearance of your pages, you can focus on the website structure and navigation menu.
As mentioned, templates are complete projects with pages already included, so depending on the one you selected, you will already find a number of pages organized into a menu. In any case, you are free to make all the changes you need:
- Go to Step 3 - Sitemap: here you can see the pages already included.
- You can create new pages using the New Page button.
- Use Levels to organize menus and submenus.
- Rename the pages: this defines the navigation menu items.
- Remove any unnecessary pages.
- Click Preview to check the menu structure and website navigation.

The Sitemap you create automatically defines:
- the website structure;
- the menu items;
- navigation between pages.
#tip - You can return to the Sitemap and modify it at any time: the navigation menu items will be automatically created and updated according to the sitemap. For more information, see Sitemap. How can you organize pages and menus effectively?
4. Build the pages and add contents
Now it is time to create the page contents.
With WebSite X5, you work completely visually: each page is represented as a grid where you can add different contents simply by dragging the available Objects.
#tip - The entire process is explained in detail in the guides How do you set up the Layout Grid? and How do you add content to a page?
Since you started from a predefined template, at this point your project should contain:
- pages already included in the template: these are already complete but need to be customized and completed with your own contents.
- pages you added later: these are empty. You need to insert and organize the required contents.
The process for creating or customizing a page is similar:
- In Step 3 - Sitemap, select the page you want to edit and click Next.
- In Step 4 - Page Creation, drag the Objects into the layout grid.
- Double-click the inserted Objects to access their settings.
- Insert texts, images, videos, and all the required contents.
- Use the available options to define style, layout, and responsive behavior.

For example, you can easily create:
- an “About Us” page;
- a photo gallery;
- a product page;
- a contact form;
- a landing page;
- a portfolio.
Remember: whenever you want to check the result, you can use the Preview button to open the website directly in the local browser.
#tip - Objects are the content blocks at the core of page creation. WebSite X5 provides all the Objects you need: from text to images, from galleries to email forms. In addition, in the Marketplace you can find many Optional Objects to add new functions and further enrich your website.
Step 5 - Export your website online
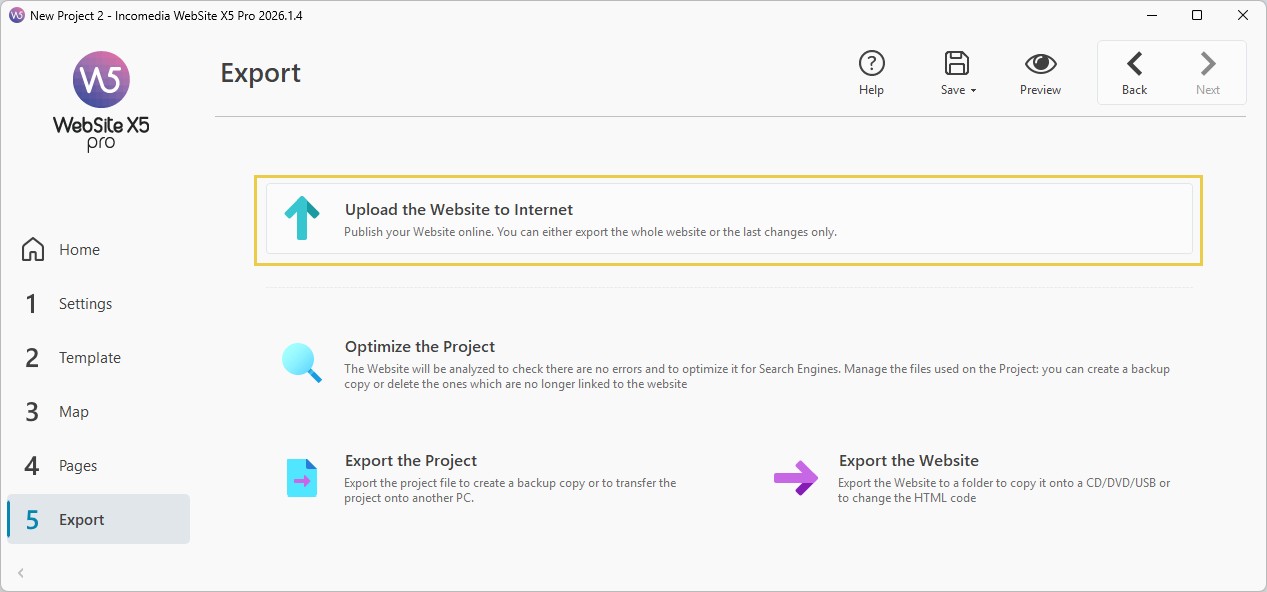
Now that you have inserted all the contents on your pages, your website is ready. You just need to export it online, so that everyone can see it.
- Go to Step 5 - Export and select Upload the Website to Internet.
- Choose the Webspace Provider you want to use.
- If you choose a WebSite X5 Hosting, you don't need to do anythign special after its activation: all the connection parameters are already integrated (see: How to export your website using the Hosting service included with WebSite X5)
- If, on the other hand, you choose an external provider, you need to click on the Parameters button to access the Server Settings window and report the connection parameters manually: if you're now sure about them, please contact your Provider, i. e. the service you bought your webspace and domain from (see: How to export your website using a Hosting service different from the one included with WebSite X5)
- Click on Start to launch the upload.
#tip - Remember that with WebSite X5 the web hosting service is included for you: find out more about WebSite X5 Hosting.
Practical tips
Creating an effective website does not simply mean publishing pages online, but building a project that is clear, consistent, and easy to navigate.
To achieve better results:
- choose a template that matches the field of your project;
- keep navigation simple and intuitive;
- pay attention to texts, images, and SEO content;
- always check the result on smartphones and tablets as well;
- quickly publish a first version of the website and improve it progressively;
- use images that are consistent with your brand identity;
- keep the website updated over time.
A well-designed website improves the credibility of your online project, makes communication with your audience easier, and can become a key tool for promoting activities, services, or content.
In summary
With WebSite X5 you can create a professional website without writing code, working through a simple and intuitive visual editor.
Thanks to customizable templates, ready-to-use Objects, and integrated publishing and management tools, you can quickly turn an idea into a complete and responsive website.
Whether you want to create a personal website, a business website, a portfolio, or a more advanced professional project, WebSite X5 allows you to manage everything in a simple, flexible, and completely visual way.