Compatibility:
WebSite X5 Evo and Pro
A website’s structure is just as important as the content it presents.
Even the best-designed pages can be ineffective if visitors cannot find them easily or get lost while navigating the site.
For this reason, before creating texts, images, and content, it is worth spending some time organizing the structure of your website.
In WebSite X5, this task is managed through the Sitemap, available in Step 3 - Sitemap, where you can create pages, organize menus, and define the navigation paths that will guide visitors through the different sections of your project.
In this guide, we will see:
- How to plan your website structure
- How to organize pages and menus
- How to create the Sitemap in WebSite X5
- How to manage pages in the Sitemap
- How to modify and update the website structure
- What special pages are
#tip - A well-organized Sitemap makes the website easier for visitors to navigate and also helps search engines better understand the structure of your content.
Before creating the Sitemap, think about the content
Before you start adding pages and levels to the Sitemap, it is useful to consider what information your website visitors will be looking for.
The answer to this question will help you determine:
- which pages to create;
- which topics deserve a dedicated section;
- which content should be given greater visibility;
- how to organize the navigation menu.
In general, the structure of many websites follows a similar pattern:
- Home Page, to introduce the project;
- Main pages, dedicated to the most important topics;
- Subpages, used to explore specific topics in greater detail;
- Contact page, to make it easier for visitors to get in touch.
For example, a professional's website could be organized as follows:
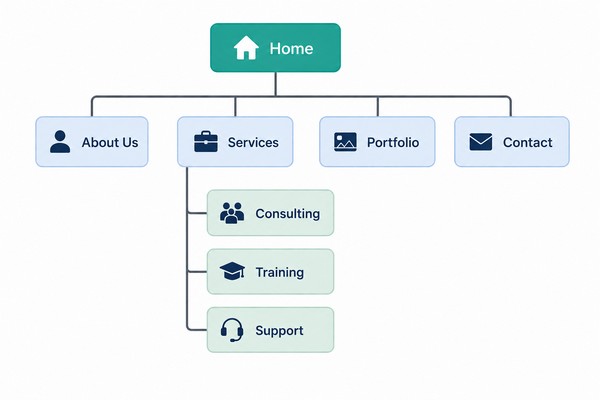
Defining the overall website structure in advance allows you to work more efficiently and avoid making continuous changes during development.
How to organize pages and menus
The Sitemap is not only used to create pages: it also defines the structure of the navigation menu.
Every page added to the Sitemap can become a menu item, and each Level can contain additional pages or sub-levels.
When organizing your website structure, try to:
- use clear and easy-to-understand names;
- group related content under the same Level;
- avoid overly long menus;
- limit the number of navigation levels;
- maintain a consistent structure throughout the website.
A good rule is to ensure that visitors can reach the most important information with just a few clicks.
#tip - If a page contains secondary or in-depth information, you may consider adding it as a hidden page, accessible through specific links but not displayed in the main navigation menu.
How to manage pages in the Sitemap
Once added, pages can be configured and managed directly from the Sitemap using the commands available in the top Toolbar.
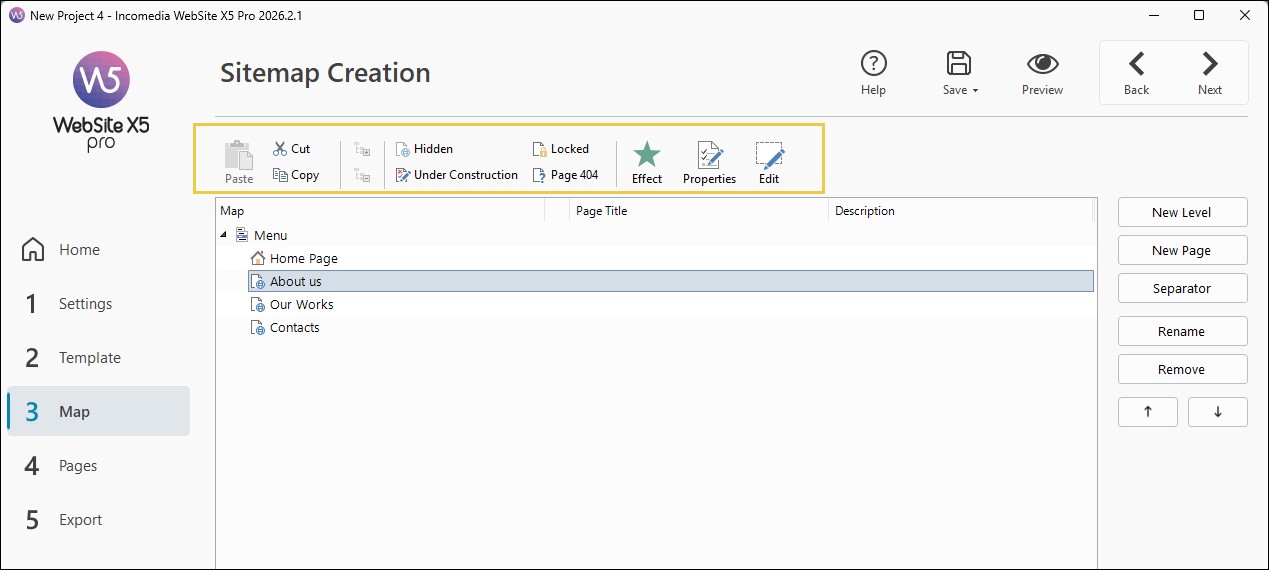
Let's look at some of the most common operations you may want to perform:
Hide a page
You can prevent the selected page or Level from being displayed in the main navigation menu. All pages contained within a hidden Level will also be hidden.
Hidden pages are particularly useful for:
- additional information pages;
- landing pages;
- content accessible only through specific links.
#tip - Remember to create at least one link pointing to the hidden page, otherwise it will not be accessible. For more details, see How can you create an in-depth page that opens in a popup window?
Protect a page
You can restrict access to a specific page by defining which users or groups are allowed to view it.
#tip - This feature is the basis for creating private areas. For more information, see: How can you create a private area and manage access?
Mark a page as "Under construction"
If a page is not yet ready, you can mark it as Under construction.
In this case:
- it will remain available in the local Preview;
- it will not be published online when exporting the website.
#tip - Learn more in the guide How can you manage a page that is not yet complete?
Set a 404 Page
You can choose a custom page to display when a visitor tries to access unavailable content.
A well-designed 404 Page helps improve the browsing experience and reduces the risk of visitors leaving the website.
#tip - Each project can have only one 404 Page, selected from pages that are not marked as Special, Protected, or Under construction. See: How can you create a 404 Page?
Edit page properties
Using the Properties command, you can define specific settings for the selected page or Level.
How to modify and update the website structure
The Sitemap is not fixed: it can be modified at any time during the development of the project.
To update the structure, you can:
- rename pages, Levels and Separators by simply double-clicking the item you want to change or using the Rename [F2] command;
- move items using Drag & Drop or the Move Up [CTRL + U] / Move Down [CTRL + D] commands;
- remove items that are no longer needed by selecting them and clicking Remove [DEL];
- add new pages and Levels using the commands described earlier.
This flexibility allows you to adapt the website structure as your project grows and evolves.
Once the Sitemap is complete, you can start working on the content of each page.
To do so, simply:
- double-click the desired page;
- or select it and click the Edit button.
You will be automatically taken to Step 4, the page creation editor.
#tip - Some of the most frequently used commands are also available in the context menu that appears when you right-click directly on the Sitemap. In addition, the context menu includes the 'Set as Home Page' command (see: How do you set a page as the new Home Page of the project?).
What are Special Pages?
As you continue working on your website, you may add advanced features such as:
- an internal Search Engine (see Search Object);
- an Enter Page;
- a Blog;
- a Private Area;
- an e-commerce Shopping Cart.
In all these cases, the Special Pages folder will automatically be added to the Sitemap, containing the corresponding entries: Search, Enter Page, Blog, Login Page and e-commerce Shopping Cart.

These Special Pages are automatically configured by the program. However, you can still customize them using the Properties and Edit buttons.
Practical tips
To create an effective structure:
- create only the pages you actually need;
- use simple and descriptive names;
- avoid overly complex menus;
- group similar content under the same Level;
- keep the structure consistent throughout the website;
- update the Sitemap as the project grows.
A good initial organization makes both website development and visitor navigation easier.
Summary
The Sitemap is the tool that allows you to organize pages, menus and navigation paths within your project.
Using Step 3 - Sitemap in WebSite X5, you can create a clear and organized structure, manage Levels and pages, organize the website menu and build the foundation for simple and effective navigation.
A well-designed Sitemap improves the visitor experience, simplifies project management and contributes to the overall quality of the website.