Compatibility:
WebSite X5 Evo and Pro
Anyone selling online must allow customers to easily exercise their right of withdrawal as required by the applicable legislation.
A simple contact page is not enough: you need to provide a system that allows customers to submit their request clearly and easily, while automatically sending them an acknowledgment of receipt.
With WebSite X5, you can implement this functionality without any additional technical work by using the Contact Form Object together with its automatic confirmation email feature.
In this guide, you will learn how to:
- Understand why you should create a dedicated withdrawal page
- Create a dedicated withdrawal page
- Add and configure the request form
- Set up request delivery to the website administrator
- Enable the automatic confirmation email for customers
- Make the page easy for visitors to find
#tip – To learn more about the Contact Form Object, see the guide How do you work with the Contact Form Object?
1. Why create a dedicated withdrawal page?
Providing a dedicated withdrawal page is not only good practice for improving the customer experience, but it can also help you meet the obligations established by consumer protection legislation.
Directive (EU) 2011/83 on consumer rights, as amended by Directive (EU) 2019/2161 (Omnibus), provides that consumers must be able to communicate their decision to withdraw from a contract electronically and that, when a trader offers this option on their website, the consumer must receive confirmation on a durable medium, such as by email.
The solution described in this guide uses the Contact Form Object together with WebSite X5's automatic confirmation email feature to implement this functionality directly within your website, without the need for external tools or custom development.
#note – The procedures for exercising the right of withdrawal and the related legal requirements may vary depending on the type of business and the applicable legal framework. Before publishing your website, always verify that the chosen solution complies with the regulations in force in the country where you operate and with the characteristics of your online store.
2. How to create a dedicated withdrawal page
The first step is to create a dedicated page that will contain the form customers can use to submit their withdrawal request. You can then make it easily accessible by adding a link to it in your website footer.
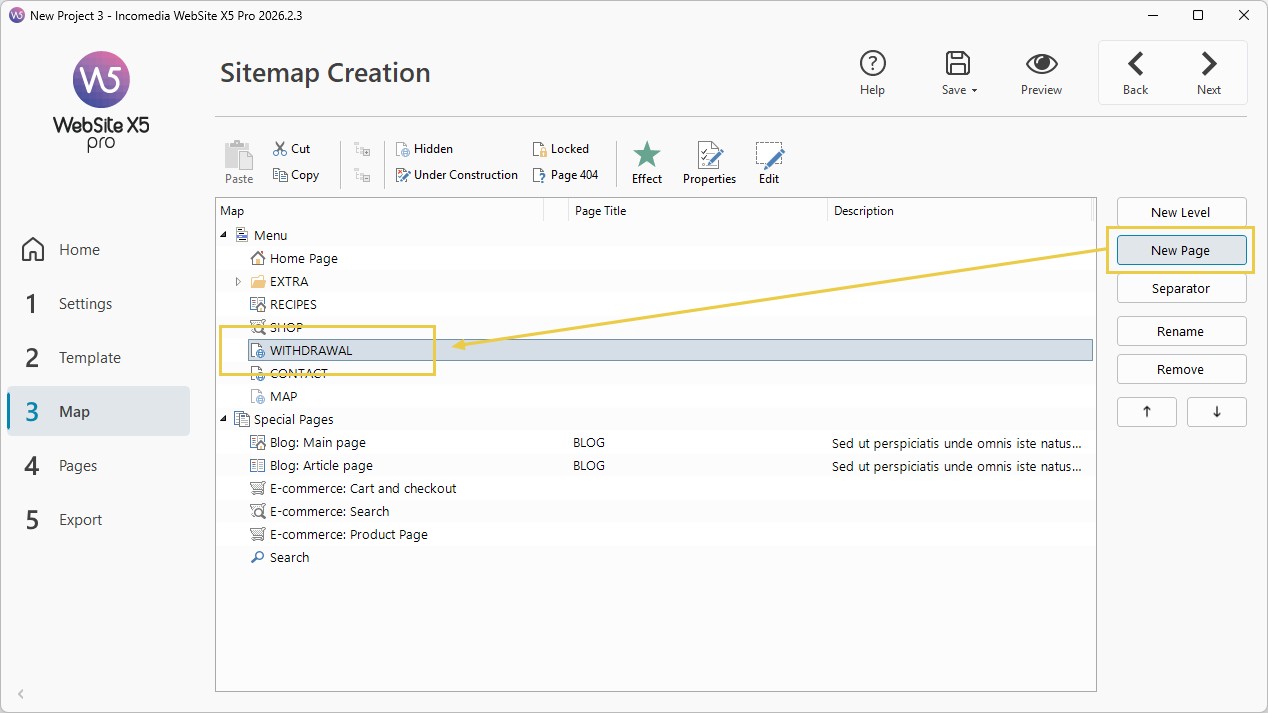
- Open your project and go to Step 3 - Sitemap.
- Add a new page and give it an appropriate title, such as "Withdrawal" or "Right of Withdrawal".
- We recommend placing it at the first level of the website structure so that it is easy to reach.
- This page does not need to appear in the main navigation menu: you can exclude it from the menu and make it available through a link in the website footer (see point 6).
3. How to add and configure the Contact Form
Once you have created the page, you can add the Contact Form Object that will allow customers to submit their withdrawal request. Configure it so that it collects all the information needed to identify the order and process the request correctly.
- Double-click the page you have just created to switch to the editing phase in Step 4 - Page Creation.
- From the list of available Objects, drag the Contact Form Object into a cell of the page layout grid.
- Double-click the Object to open its settings window.
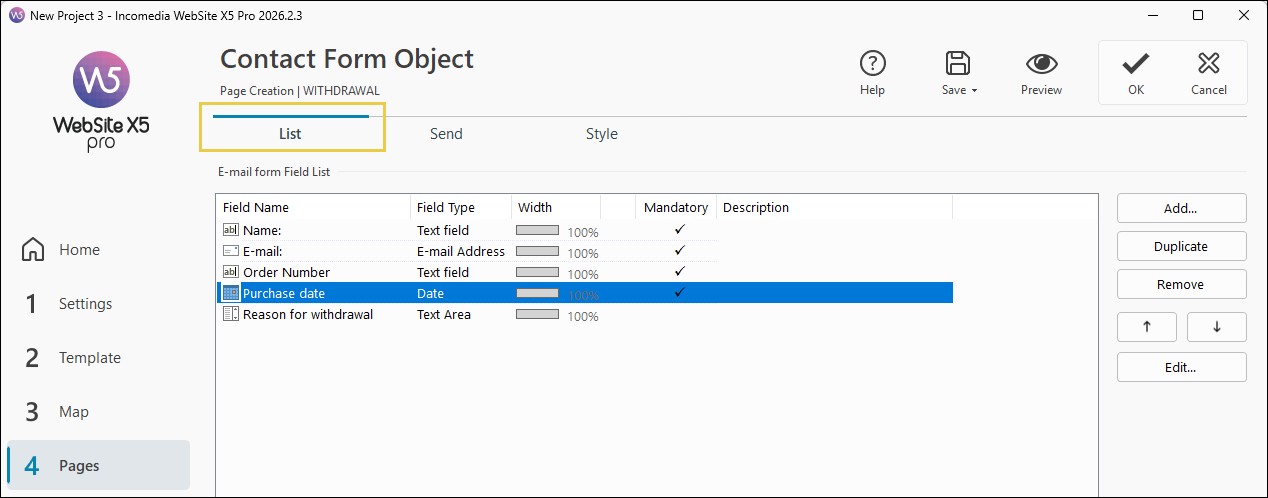
- In the List section, add the required fields by clicking the Add button.
- For each field, select the appropriate type, set its label and enable the Set as mandatory field option whenever appropriate.
The fields can of course be customized to suit the needs of your online store. For a standard configuration, however, we recommend collecting at least the following information:
| Field | Recommended type | Mandatory |
| Full name | Text field | Yes |
| Email address | Email address | Yes |
| Order number | Text field | Yes |
| Purchase date | Date | Yes |
| Reason for withdrawal | Text area | Recommended |
- For the Purchase date field, open the field configuration window and enable the Show "Calendar" icon option. This allows visitors to select the date using a visual date picker instead of entering it manually.
#tip – For a detailed guide to creating and configuring form fields, see How do you create an online registration form?
4. How to configure request delivery
Once the form has been defined, you need to decide how the information entered by users will be handled. In this case, the goal is to ensure that every withdrawal request is automatically sent to the store owner's email address so that it can be processed promptly.
- Go to the Send section of the Contact Form Object.
- Under Data sending mode, select Send data by email, then configure at least the following fields:
- User email address: enter the address where you want to receive withdrawal requests. It can be the same address used by the store or a dedicated mailbox, for example "withdrawal@yourdomain.com".
- Subject: use an easily recognizable text, for example "Withdrawal request".
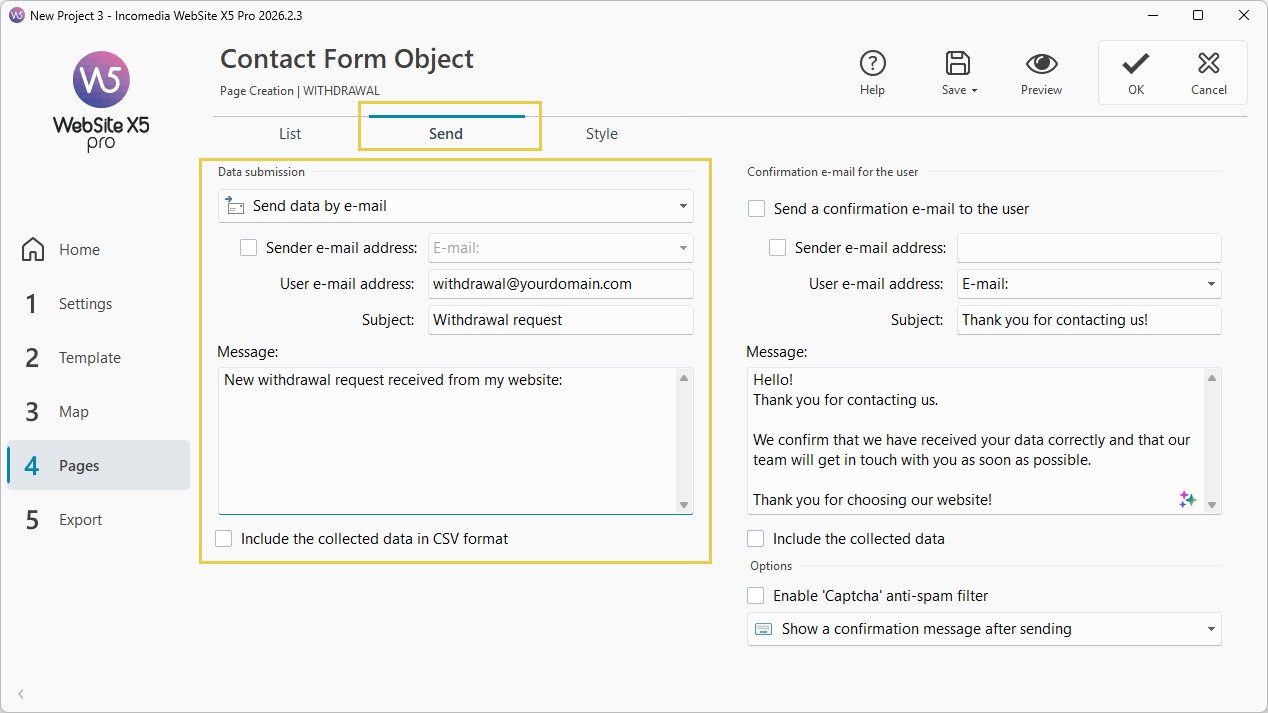
The emails you receive allow you to keep a record of the date and time each request was submitted, which is also useful for processing and any future verification.
#tip – To learn more about the available options, see How do you configure sending data collected through a form by email?
5. How to enable the automatic confirmation email for the customer
In addition to receiving the request, it is important to automatically send a confirmation to the user who completed the form. This way, the customer immediately receives proof that the request has been submitted and confirmation that the communication has been successfully received.
- Still in the Send section, scroll down to the Confirmation email for the user panel and enable the Send a confirmation email to the user option.
- Then configure the following fields:
- User email address: from the drop-down menu, select the Email address field of the form so that the confirmation is automatically sent to the address provided by the customer.
- Subject: use a clear subject, for example "Confirmation of withdrawal request received".
- Message: enter the text of the automatic confirmation message.
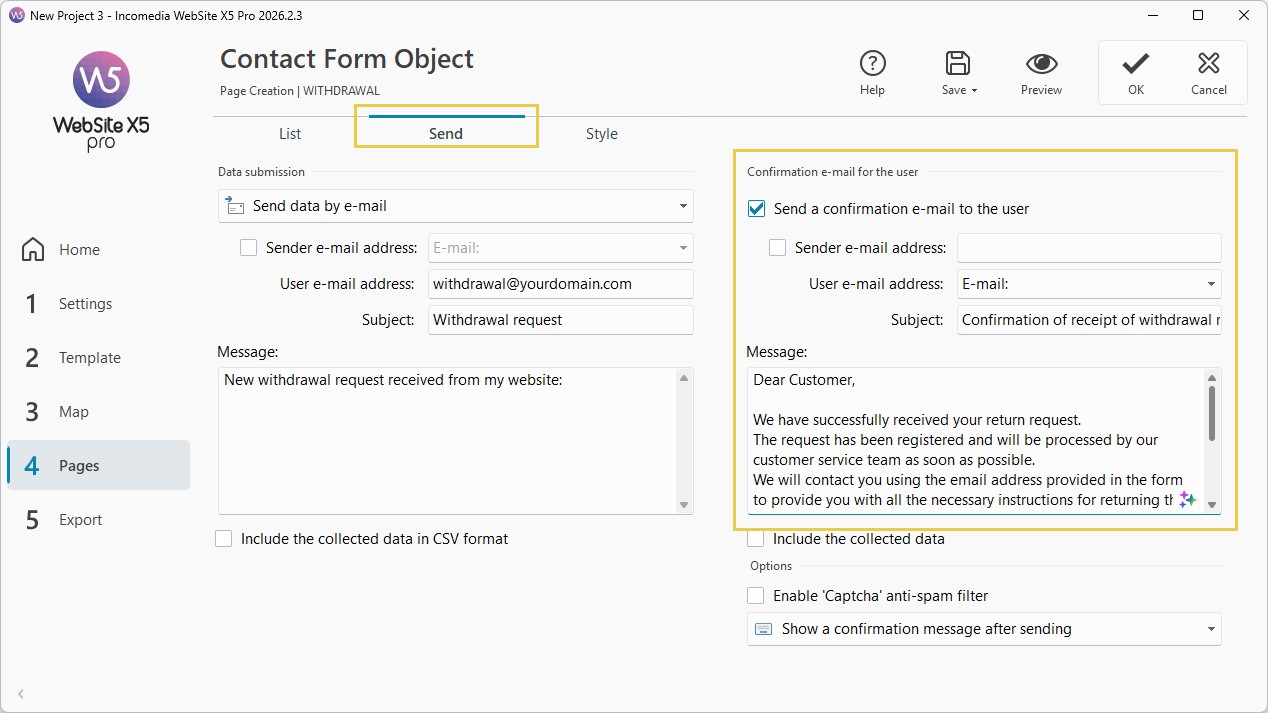
You can use a simple text for the confirmation email and adapt it to the needs and communication style of your online store, choosing a more or less formal tone depending on your relationship with customers. For example:
Dear Customer, We have successfully received your withdrawal request. Your request has been recorded and will be processed by our customer service team as soon as possible. We will contact you using the email address provided in the form to give you all the necessary instructions for returning the product and handling your request. Please keep this email as proof that your request has been successfully submitted. Kind regards, [Store name / Company name] |
#tip – For more information about this feature, see How do you set up an automatic reply email for users who complete a form?
6. How to make the page easy to access
The legislation requires that consumers must be able to exercise their right of withdrawal in a simple and easily accessible way.
For this reason, it is advisable to add a link to the withdrawal page in the website footer, which is displayed on every page. This ensures that the link is always available, even after the purchase, and can be reached quickly from any section of the website.
- In Step 3 - Sitemap, select the page you created for withdrawals.
- Prevent it from appearing in the main navigation menu by clicking the Hidden button.
- Then go to Step 2 - Template Settings > Template Content.
- Open the Footer section and use the editor to add a link to the withdrawal page (for example, by using a Text Object).
You may also want to include a link to the same page in the order confirmation email or in other communications sent to customers.
#tip - You can learn more by reading the guide Header and Footer. How do you modify the structure of the website template?
Practical tips
For an effective solution:
- verify that the form works correctly by performing at least one test submission;
- check that the confirmation email is correctly received by the customer;
- keep a record of the requests received and the related confirmation emails;
- make sure the link to the withdrawal page remains clearly visible at all times;
- review the page content periodically to keep it aligned with any regulatory changes.
#tip – Always verify that everything works correctly after publishing. The Contact Form Object only sends emails when the website is published on a server that supports PHP and the MAIL command. If you use WebSite X5 Hosting, no additional configuration is required.
Summary
With WebSite X5, you can create a dedicated page for exercising the right of withdrawal by using the Contact Form Object and the automatic confirmation email feature.
By configuring the form, request delivery and confirmation message correctly, you can provide your customers with a simple and easily accessible way to communicate their decision to withdraw from a purchase while also improving the organization and management of incoming requests.