Compatibility
WebSite X5 Evo and Pro
You have created your website pages, added text and images, and organized the navigation menu. Before publishing the project online, however, it is always a good idea to check that everything works correctly.
With the WebSite X5 Project Preview, you can browse your website directly on your computer and check the final result before publishing it. This allows you to verify the appearance of the pages, the functionality of links, and the behavior of the contents, correcting any issues before the website becomes visible to visitors.
In this guide, we will see:
- How to open the Project Preview
- What you can check in the Preview
- How the local Preview is displayed
- How to check a responsive website
- How to define Preview preferences
#tip - Regularly checking your website in Preview while working helps you quickly identify any errors and achieve a more polished and professional final result.
How to open the Project Preview
Viewing your website in Preview is very simple.
Simply click the  Preview button, which is always available in the top bar of WebSite X5.
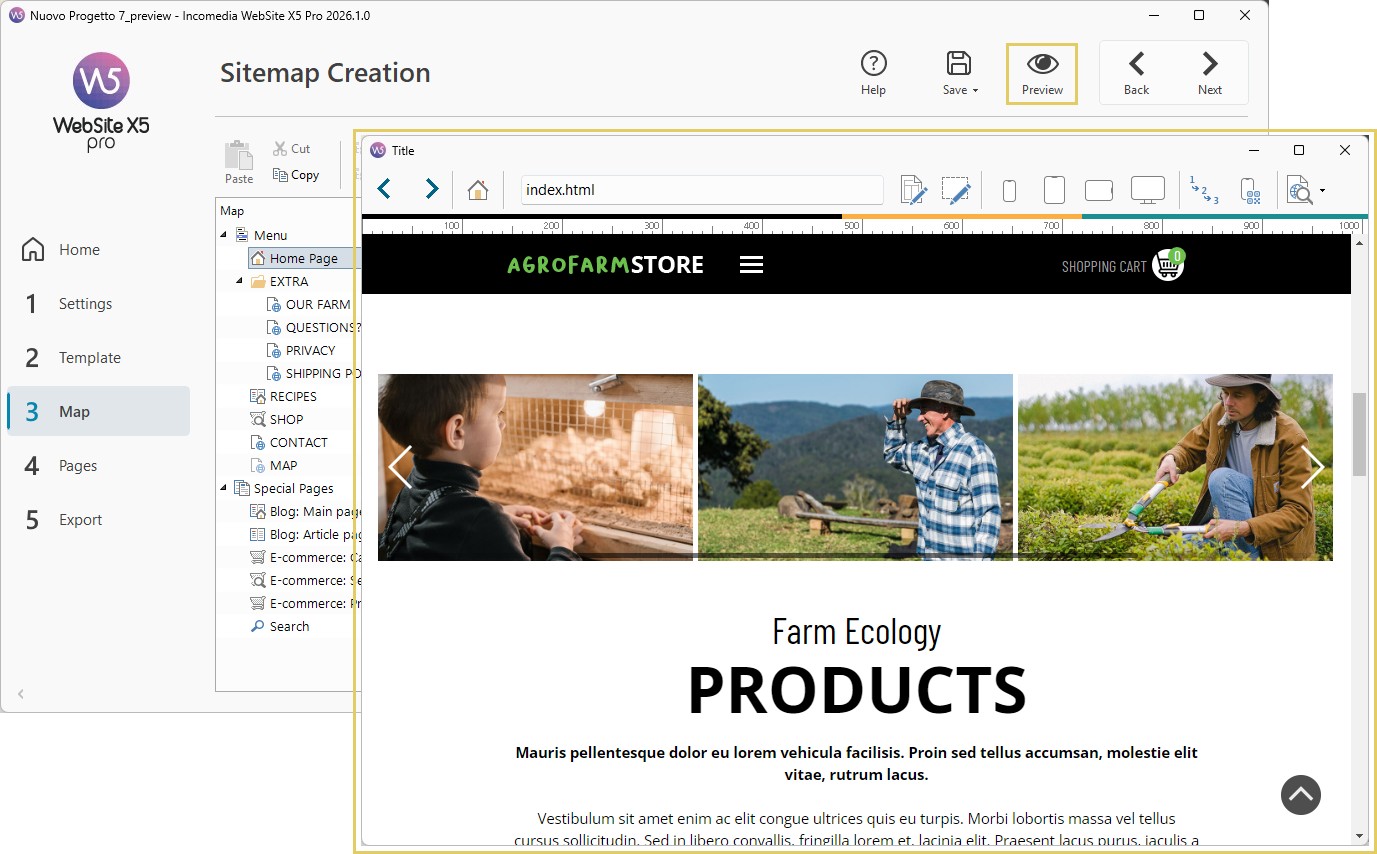
After a few moments, the integrated browser will open and you can start browsing the website exactly as a visitor would.
#tip - For local preview display, WebSite X5 uses an internal browser based on Chromium (http://www.chromium.org/), the same technology on which Google Chrome™ is based.
What you can check in the Preview
The local Preview is not just for viewing the website: it is a useful tool for verifying the work you have done before publishing the project.
You can use it to check:
- the visual appearance of the pages;
- the correct display of text and images;
- the functionality of menus;
- internal and external links;
- forms and interactive content;
- the responsive behavior of the website.
While browsing, you can also switch quickly from the Preview back to the WebSite X5 workspace to correct pages and content, significantly speeding up the review process.
For this reason, it is advisable to use the Preview frequently throughout the entire development process and not only before the final publication.
How the local Preview works
Once the Preview is open, the internal WebSite X5 browser provides several tools for browsing the website and quickly making changes to the project.
You can use:
 Back /
  Forward /
  Home Page to move between previously visited pages and quickly return to the Home Page.
- The Address Bar to display the path of the currently open page.
 Edit this page to return directly to the page currently being displayed and edit its contents. If you are viewing a Blog page, a Private Area page, or the e-commerce cart, you will return to the corresponding section in Step 1.
 Edit this object to enable/disable editing mode and work directly on a specific element (Object or Template section) displayed on the page.
 Mobile Preview (Pro only) to view the website on your smartphone via QR Code. Simply connect your mobile device to the same network as your PC, scan the QR Code, or open the provided URL: you will see a preview of your website and be able to check its behavior.
 View the website in another browser (Pro only) to verify the project's behavior using different browsers installed on your computer.
One of the most useful advantages of the Preview is the ability to switch quickly from browsing to editing the website without having to manually search for the page or Object that needs updating.
#tip - You can quickly enable Object editing mode by holding down the CTRL + SHIFT keys at the same time.
How to check a responsive website
If you are creating a responsive website (see How do you create a Responsive Website?), the Preview provides specific tools for checking how pages behave at different screen resolutions.
In particular, you can use the Resolution Bar, which displays the breakpoints configured in the project.
Using the 


 controls, you can:
- simulate different screen widths;
- check how content adapts;
- verify the arrangement of Objects at different breakpoints;
- identify layout issues before publication.
You can also use the  Show Linearization Order command, which highlights and numbers the Objects on the page, making it easy to verify the order in which they are displayed at lower resolutions.
These tools are particularly useful for ensuring that the website provides a good browsing experience on smartphones and tablets as well.
#tip - For more information, you can also read the guide How can you verify the behavior of a responsive website in the local Preview?
How to configure Preview preferences
WebSite X5 allows you to customize the behavior of the Preview through several options available in the Preferences window.
To access it:
- open the Welcome Window;
- click the
 Preferences button.
Among the available options, you will find:
- Create Pages while editing the project
When this option is enabled, the program automatically updates all elements affected by the changes you make.
- Update Preview while editing the project
Available when the previous option is enabled, this automatically refreshes the Preview browser while you work on the project.
This allows you to immediately view your changes without having to reopen or manually refresh the Preview.
Practical tips
To make the most of the Project Preview:
- check the website frequently during development;
- always verify menus and links before publishing;
- check that images are displayed correctly;
- test responsive behavior at different screen resolutions;
- use the quick editing features to correct any issues more efficiently.
Spending a few minutes on final checks can help you publish a more polished and professional website.
Summary
The Project Preview is the tool that allows you to verify your website before publishing it online.
Thanks to WebSite X5's integrated browser, you can check the design, content, links, and responsive behavior of your website, while also being able to return quickly to the editor to make any necessary changes.
When used regularly throughout development, the Preview helps you identify and correct potential issues before the website is published and made available to visitors.